Dry, Dammit!

A nail blog by an impatient polisher


Leave a comment

Picture Polish Embrace & water decal nail art

*Nothing to disclose

Picture Polish Embrace nail art by Dry, Dammit!

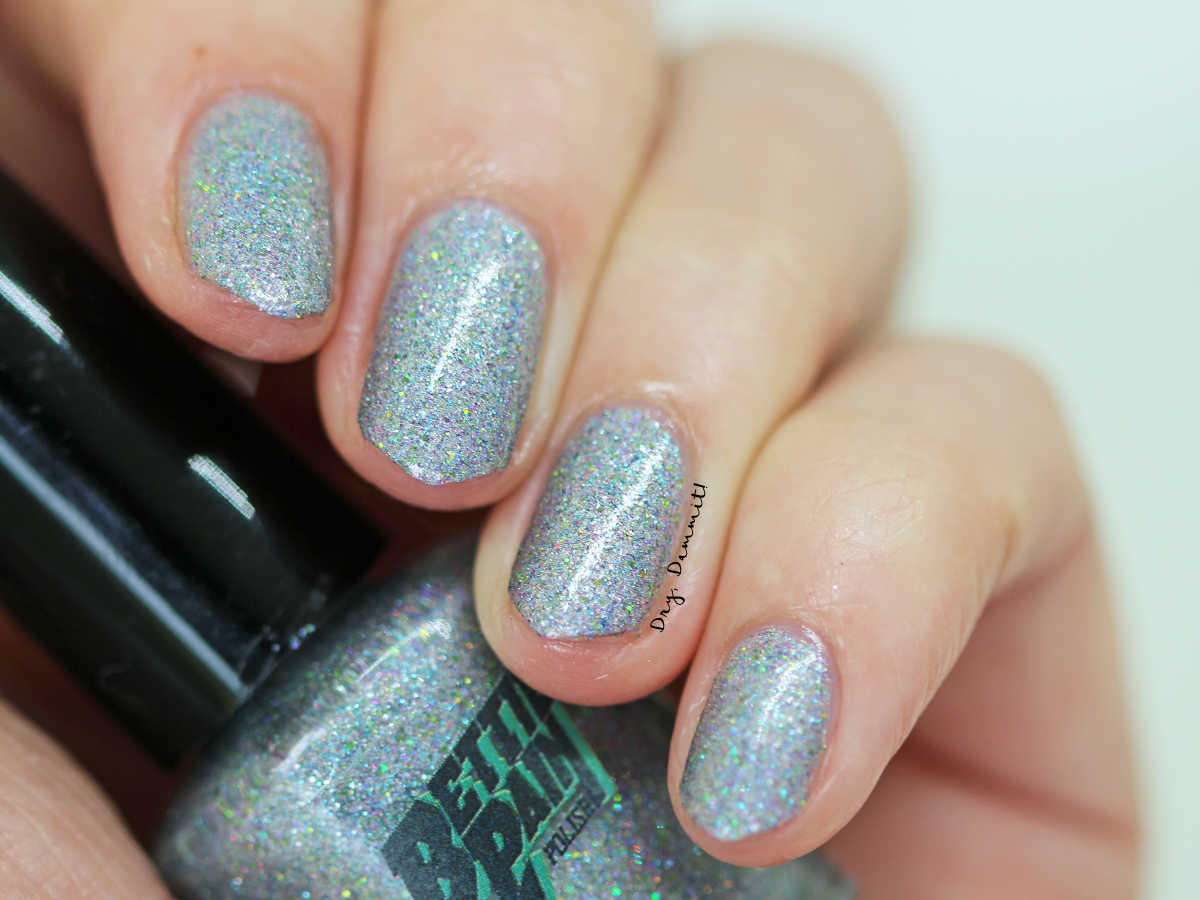
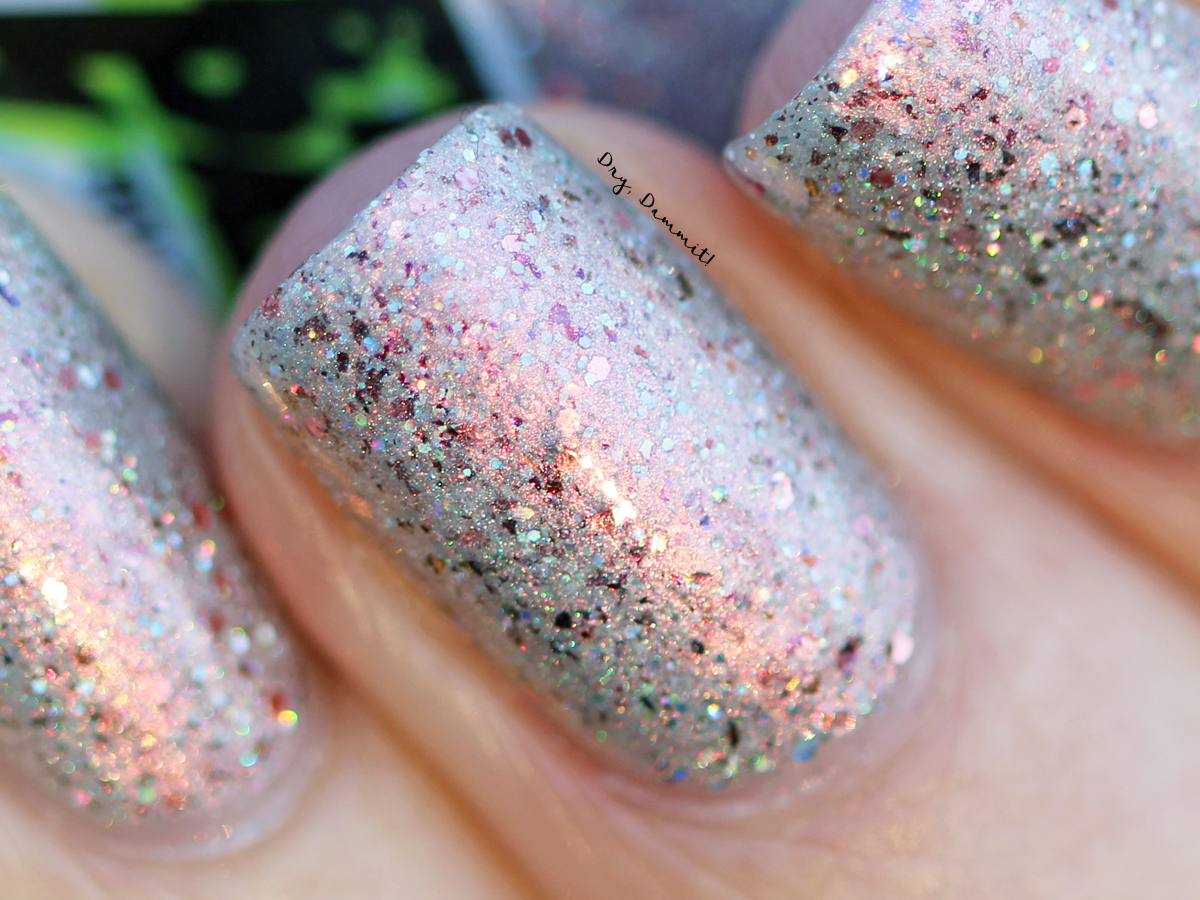
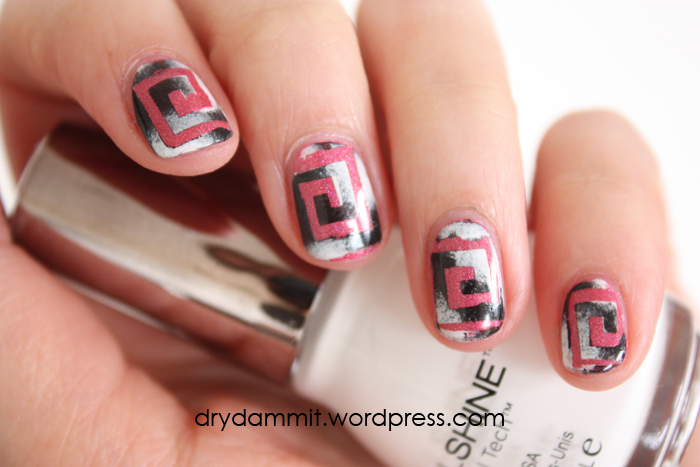
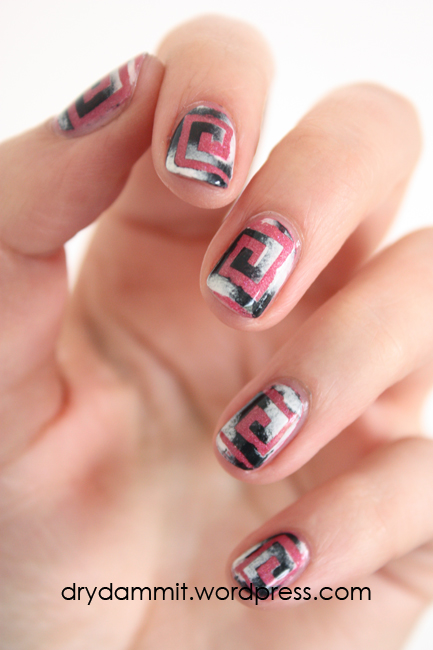
You probably wouldn’t believe it, but Picture Polish Embrace is hiding underneath this nail art! I used water decals and thought there’d be more “transparent” areas – turns out this is not the case. It’s incredible to see how much Embrace changes when it’s got some nail art over it! Testament to its subtle appearance.

Picture Polish Embrace swatched by Dry, Dammit!

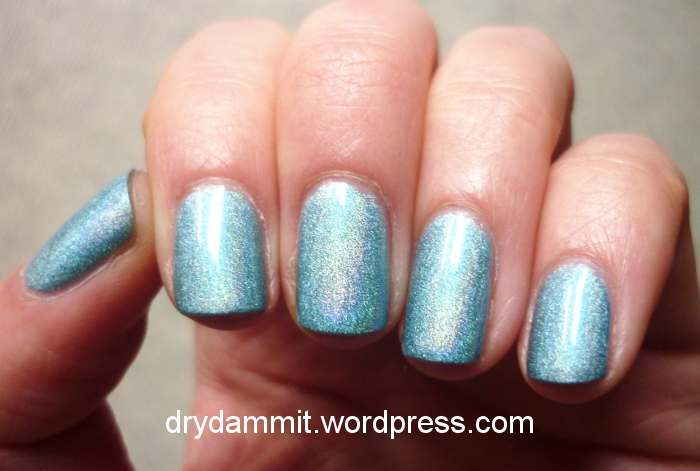
Embrace is described as a “dusty pink holo with holo flakes”. Let me reiterate, the holo is subtle in this one. It really doesn’t like coming out to play unless you use artificial lighting (which I didn’t). Still, I quite like this polish. I remember I bought it in 2017 when Picture Polish were also selling it with a corresponding lip colour (see Marine Loves Polish’s blog post about it) and I also loved the neutral pinky-ness of the lipstick then.

Application was really easy; this is just two coats and a top coat of Seche Vite. For some reason though the polish did shrink on my index finger after applying the top coat, but I’m thinking I didn’t wrap my tip properly as opposed to there being something wrong with the polish (given the other nails are fine!).

Picture Polish Embrace swatched by Dry, Dammit!

So, back to the nail art. My thought process was that the water decals would have wide enough gaps so when I added the nail polish lines you could easily see Embrace. But no. I think my nail art brushes are pretty average, so forgive my freehand work! They looked OK from a distance and I loved how the silver and copper (OPI DS Radiance and OPI Sprung) stood out on the nail.

The water decals I purchased from Born Pretty Store in 2017 so I don’t think they’re about still sorry, but to give you a better idea of what they were, they were yellow, purple and pink flowers. The water decals were also labelled “3D nail sticker” on its packaging, with instructions on how to “rub” the sticker on for the best result – don’t do this with water decals, peeps!

Picture Polish Embrace nail art by Dry, Dammit!

DETAILS

  • Where to buy: Picture Polish
  • Cost: AU$14.95 (currently out of stock :()
  • Volume: 11ml
  • Coats to opacity: Two

I’d be interested to hear your thoughts on this one, so let me know if you prefer Embrace as is or with the nail art. Thanks for reading!

Follow me on Instagram | Pinterest | Bloglovin’


Leave a comment

Bettie Pain Polish Spring 2018 Collection

*Press sample

Hello, hello! I have a wonderful six-piece collection by Bettie Pain Polish to show you, which is being released this Saturday. The collection is simply named Spring 2018 and I found the polish names to be very curious. Instead of things like “Sunflower” and “Rainbows” we have “Neon Graveyard” and “Psyche”. But then I thought maybe it’s a bit of a tribute to Halloween as here in Australia we have Halloween in spring.

But that’s enough musing about the names. If you love flakies you’re going to LOVE this collection as each polish has its own take on flakies. I haven’t been this excited about flakies in a long time, let me tell you! I think in about 2014/15 there were heaps of flakies going on but I could be wrong… anyway, on to the polish!

Bettie Pain Polish Spring Collection swatched by Dry, Dammit!

Bettie Pain Polish Spring 2018 Collection swatched by Dry, Dammit!

Bettie Pain Polish Jet Stream swatched by Dry, Dammit!JET STREAM

Bettie Pain Polish Jet Stream swatched by Dry, Dammit!

This is probably going to be pretty obvious to everyone when I say Jet Stream is my favourite from the collection, if you know about my love for blurples. It’s a dark blue/purple base with a lots of micro holo glitter, pink/red shimmer and gold and red flakies. This polish really comes out to play in the sun or strong lighting. Formula-wise it’s glides on like butter and what you see here are two coats with top coat.

Bettie Pain Polish Neon Graveyard swatched by Dry, Dammit!NEON GRAVEYARD

Bettie Pain Polish Neon Graveyard swatched by Dry, Dammit!

Neon Graveyard is a very close second favourite from this collection. It’s a neon pink with purple flakies and crystal purple microglitter. When are neons never favoured? I feel like this is going to be a nice polish to wear now and in summer as well (but let’s face it, I’m just going to wear it whenever I want, no matter the time of year). The formula is slightly sheer but builds up easily, although I did find the polish in the bottle got thicker towards the last coat. This is three coats with a top coat.

Bettie Pain Polish Enigma swatched by Dry, Dammit!ENIGMA

Bettie Pain Polish Enigma swatched by Dry, Dammit!

At first I thought Enigma was a thermal, but after mucking about with it under water I soon realised it wasn’t. Which is maybe why it’s called Enigma? Because looking at the pics I still think it looks like it’s doing its own subtle transition? It’s a navy blue jelly with an emerald overlay and bright green flakies. Like Neon Graveyard, I found the formula on this one a bit sheer, so I had to use three coats. I probably could have used four! I also added top coat.

Bettie Pain Polish Psyche swatched by Dry, Dammit!PSYCHE

Bettie Pain Polish Psyche swatched by Dry, Dammit!

I think Megan of Bettie Pain Polish does the best blue polishes, hands down. I mean, Psyche is just so gorgeous, how could even a not-a-blue-lover like me not like it? See also We Were on a Break from Bettie Pain Polish’s 90s Collection as another case in point. Psyche is a bright blue with green shimmer, silver holo glitter and flakies of purple, green and gold. Another sheer one, I’m wearing three coats with top coat.

Bettie Pain Polish Eden transition swatched by Dry, Dammit!EDEN

Bettie Pain Polish Eden transition swatched by Dry, Dammit!

Eden is the only thermal from the collection and I’m soooo glad it’s in it. My favourite colour is when it’s cold – it’s a striking vibrant pinkish red and when warm, it’s a more neutral dusty purple. How thermals are made I’m quite ignorant about but it truly is like a dark art to me. It’s got a scattering of holo throughout and has flakies of purple, green and red. I’m wearing three coats here with top coat.

Bettie Pain Polish Eden cold swatched by Dry, Dammit!
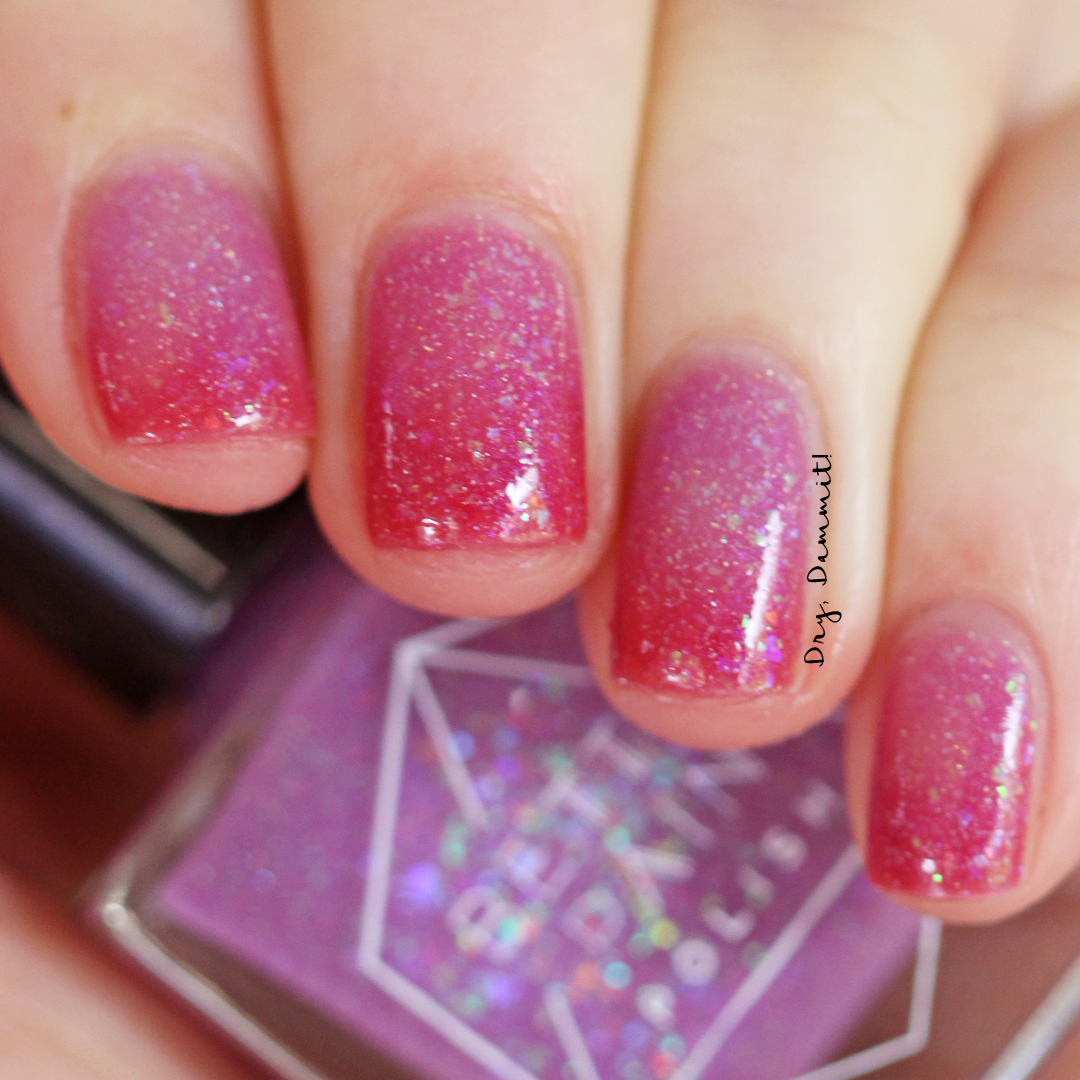
Eden in its cold state

Bettie Pain Polish Eden cold swatched by Dry, Dammit!

Bettie Pain Polish Eden warm swatched by Dry, Dammit!Eden in its warm state
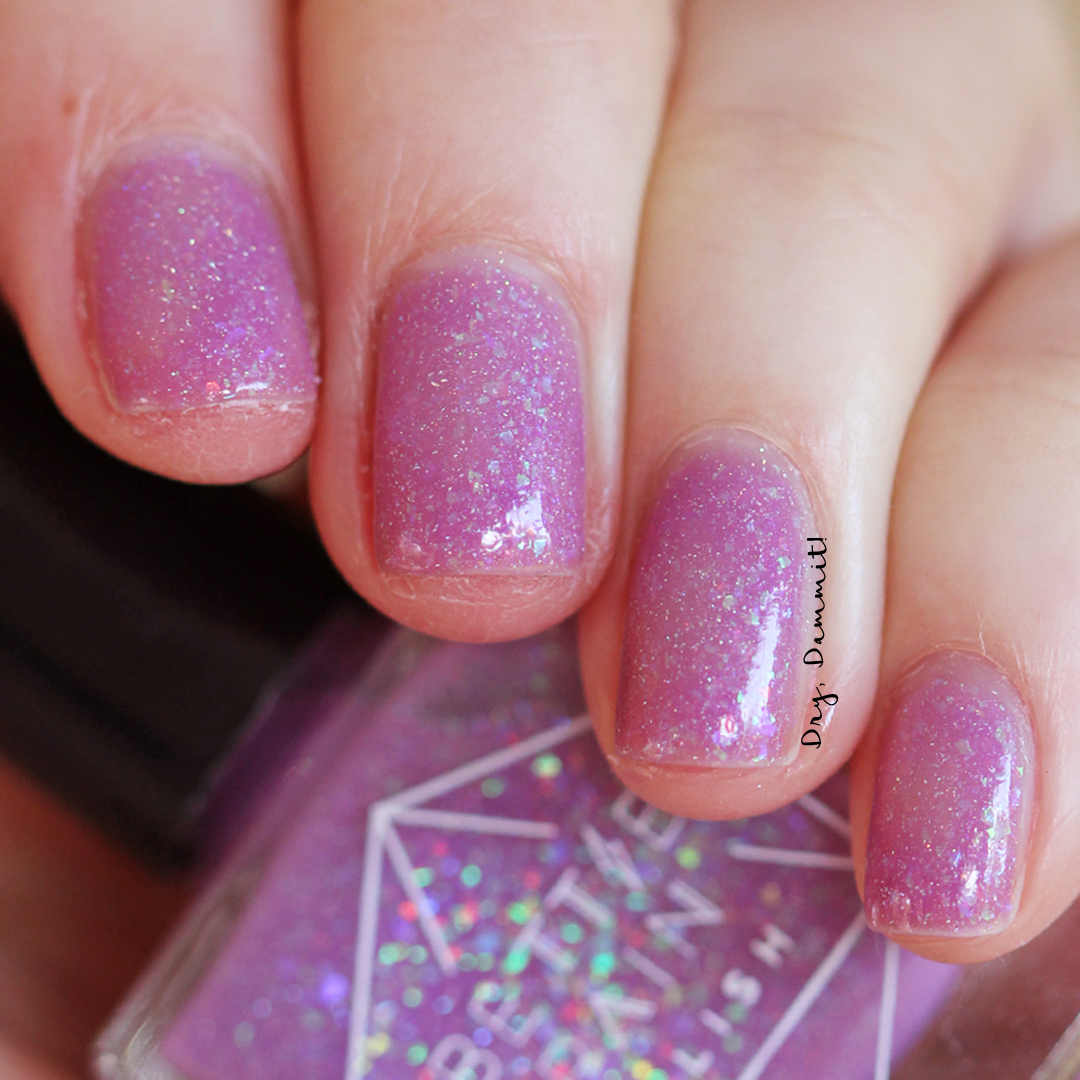
Bettie Pain Polish Eden warm swatched by Dry, Dammit!

Bettie Pain Polish Trance swatched by Dry, Dammit!TRANCE

Bettie Pain Polish Trance swatched by Dry, Dammit!

Trance is a bit weird to me. I just can’t put my finger on what base colour it is. I think it’s like a slate grey/blue; it’s very muted. It also has the best-looking flakies in it – true opal ones that just make you drool. I did find this one a little sheer too, so here I’m wearing three coats with top coat.

DETAILS

  • Where to buy: Bettie Pain Polish
  • Cost: AU$10.50-AU$12.75
  • Volume: 9ml
  • Coats to opacity: See polish descriptions above

If you like what you see here, make sure you check out the Spring 2018 Collection when it launches this Saturday 29 September AEST. Jet Stream is my pick! What’s yours? Thanks for reading!

Follow me on Instagram | Pinterest | Bloglovin’

Save

Save


Leave a comment

Bettie Pain Polish 90s Collection

*Press sample

So, you’ve probably noticed there’s been a revival in all things 90s lately. This works well for me as I’m a 90s child and it’s made me rediscover my love for pretty much everything from my childhood – tattoo chokers, boy bands and all things iridescent. The latest collection by Bettie Pain Polish is inspired by the 90s and – lucky you 😉 – I have all 10 polishes to share! So sit back and take a walk down memory lane with me as we look at the Bettie Pain Polish 90s Collection.

Bettie Pain Polish 90s Collection swatched by Dry, Dammit!

Bettie Pain Polish We Are The Weirdos Mister swatched by Dry, Dammit!WE ARE THE WEIRDOS MISTER

Bettie Pain Polish We Are The Weirdos Mister swatched by Dry, Dammit!

I’m starting with my favourite: We Are The Weirdos Mister. Inspired by the film The Craft, this is a stunning multichrome that goes from deep pink to copper to gold and to green. It also has a bit of holo thrown in for good measure. It’s simply DIVINE and if you can only get one polish from the collection I’ve just got to recommend this one. It’s like an oil slick on your nails! Formula-wise it’s also perfect and what you see here are two easy coats with top coat.

Bettie Pain Polish We Are The Weirdos Mister swatched by Dry, Dammit!

Bettie Pain Polish We Are The Weirdos Mister swatched by Dry, Dammit!

Bettie Pain Polish We Were On A Break swatched by Dry, Dammit!WE WERE ON A BREAK

Bettie Pain Polish We Were On A Break swatched by Dry, Dammit!

You most likely know I’m not the biggest blue polish fan but We Were On A Break just spoke to me and was my initial favourite from the collection (from just looking at the bottles). It’s inspired by the TV show Friends (I never actually got into it as a kid!) and it’s so bright and quirky that it’ll just cheer you up by looking at it. It’s a bright aqua blue with green shimmer and tiny green flakies and iridescent glitter… in fact, in my swatch notes I’ve described the glitter as “subtle” – but it’s there! This is two easy coats with a top coat.

Bettie Pain Polish We Were On A Break swatched by Dry, Dammit!

Bettie Pain Polish We Were On A Break swatched by Dry, Dammit!

Bettie Pain Polish Bittersweet Symphony swatched by Dry, Dammit!BITTERSWEET SYMPHONY

Bettie Pain Polish Bittersweet Symphony swatched by Dry, Dammit!

The sole thermal in the collection, Bittersweet Symphony is inspired by the song of the same name by The Verve and it’s just impossible to either not sing the song in your head or play it on YouTube when wearing it! It’s a vibrant blue when warm and a dark indigo when cold. Chuck in some tiny blue sparks and iridescent flakes and you have one pretty moody polish. This is two coats with a top coat; as with the others there wasn’t a problem with application.

Bettie Pain Polish Bittersweet Symphony swatched by Dry, Dammit!

Bettie Pain Polish Bittersweet Symphony swatched by Dry, Dammit!Bittersweet Symphony in its warm state.

Bettie Pain Polish Bittersweet Symphony swatched by Dry, Dammit!Bittersweet Symphony in its cold state.

Bettie Pain Polish Heart-Shaped Box swatched by Dry, Dammit!HEART-SHAPED BOX

Bettie Pain Polish Heart-Shaped Box swatched by Dry, Dammit!

Le sigh. Heart-Shaped Box is inspired by the one-and-only Kurt Cobain and his grandpa cardi worn during the unplugged sessions. I just think it’s just fantastic! It’s a grey subtle scattered holo with strong green shimmer. I found on application it has a tendency to be streaky, so just make sure you do light, steady strokes in thin coats. I’m wearing two thin coats with top coat.

Bettie Pain Polish Heart-Shaped Box swatched by Dry, Dammit!

Bettie Pain Polish Heart-Shaped Box swatched by Dry, Dammit!

Bettie Pain Polish Dreams swatched by Dry, Dammit!DREAMS

Bettie Pain Polish Dreams swatched by Dry, Dammit!

If you love The Cranberries, you’ll love Dreams, which is inspired by the song of the same name. Like the song, it’s an ethereal pale purple with blue shimmer and silver holo glitter. It’s dainty yet full-on at the same time. Application was great and what you see are two easy coats with top coat.

Bettie Pain Polish Dreams swatched by Dry, Dammit!

Bettie Pain Polish Dreams swatched by Dry, Dammit!

Bettie Pain Polish Backstreet's Back swatched by Dry, Dammit!BACKSTREET’S BACK

Bettie Pain Polish Backstreet's Back swatched by Dry, Dammit!

If you can’t tell from the name, Backstreet’s Back is inspired by the film clip of Everybody (Backstreet’s Back). This is a BRIGHT purple with a strong green shimmer – basically a purple lover’s dream! Very, very easy to apply and I reckon you could get away with one coat if you were careful in application. I’m wearing two thin coats with top coat.

Bettie Pain Polish Backstreet's Back swatched by Dry, Dammit!

Bettie Pain Polish Backstreet's Back swatched by Dry, Dammit!

Bettie Pain Polish Downward Spiral swatched by Dry, Dammit!DOWNWARD SPIRAL

Bettie Pain Polish Downward Spiral swatched by Dry, Dammit!

Inspired by the Nine Inch Nails album The Downward Spiral, Downward Spiral is a soft, creamy pale grey with red shimmer and purple flecks. It reminds me a bit of Celestial Cosmetics’ Android Tears, but softer. Application was just perfect and I’m wearing two coats with a top coat.

Bettie Pain Polish Downward Spiral swatched by Dry, Dammit!

Bettie Pain Polish Downward Spiral swatched by Dry, Dammit!

Bettie Pain Polish Drew swatched by Dry, Dammit!DREW

Bettie Pain Polish Drew swatched by Dry, Dammit!

Oh, Drew. WOWSERS. This is a bright rose creme with a pink/red shimmer. Just perfect. Oh, and the inspiration? Drew Barrymore of course! I’m wearing just ONE coat with a top coat – yes, the formula’s that great that you can get spot-on application in just one go.

Bettie Pain Polish Drew swatched by Dry, Dammit!

Bettie Pain Polish Drew swatched by Dry, Dammit!

Bettie Pain Polish Lost Boys swatched by Dry, Dammit!THE LOST BOYS

Bettie Pain Polish Lost Boys swatched by Dry, Dammit!

So this one’s inspired by the film of the same name from 1987 – yes, cheating the 90s theme but I reckon it can hold a bit of resonance due to other popular vampire-themed stuff going on in the 90s such as Buffy the Vampire Slayer (and I agree, the film is TOTALLY different to the TV series!). The Lost Boys is a dark charcoal base with small flecks of purple and red flakes with a subtle scattered holo. I did three thin coats here with a layer of top coat and I think it worked out pretty well for me.

Bettie Pain Polish Lost Boys swatched by Dry, Dammit!

Bettie Pain Polish Lost Boys swatched by Dry, Dammit!

Bettie Pain Polish Spice Up Your Life swatched by Dry, Dammit!SPICE UP YOUR LIFE

Bettie Pain Polish Spice Up Your Life swatched by Dry, Dammit!

Have you guessed what Spice Up Your Life is inspired by? Yep, The Spice Girls and their single of the same name. I think I watched this about a million times as a kid! So catchy. Spice Up Your Life is a bright silver holo packed with blue, purple and green microglitter. You don’t need any undies, this polish does all the work for you. It does dry grainy due to lots of glitter, so a good thick top coat is needed. I’m wearing two coats with a top coat.

Bettie Pain Polish Spice Up Your Life swatched by Dry, Dammit!

Bettie Pain Polish Spice Up Your Life swatched by Dry, Dammit!

DETAILS

  • Where to buy: Bettie Pain Polish
  • Cost: AU$10.50-AU$11.50
  • Volume: 12ml
  • Coats to opacity: See polish descriptions above

Again, if you can only pick one polish from the collection, I recommend We Are The Weirdos Mister. Otherwise, also We Were On A Break and Spice Up Your Life are definites. What do you think? The Bettie Pain Polish 90s Collection launches on Saturday 13 January AEDT, so make sure to have a look. Thanks for reading!

Follow me on Instagram | Pinterest | Bloglovin’

Save

Save


Leave a comment

Pretty Serious Cosmetics Wish You Were Beer

*Nothing to disclose

Hello there! Today I bring you Pretty Serious Cosmetics’ Wish You Were Beer. Since wearing this polish I just can’t get Pink Floyd’s Wish You Were Here out of my head! I believe this polish is limited edition and originally sold at the polish conventions Pretty Serious Cosmetics attended over the past year, including Aussie Indie Con, which I was devastated I couldn’t attend (damn baby!). But Wish You Were Beer is now up on Pretty Serious Cosmetics’ website so even if you didn’t attend the cons, you can still get your hands on it, which is what I did. 🙂

Pretty Serious Cosmetics Wish You Were Beer swatched by Dry, Dammit!

Pretty Serious Cosmetics Wish You Were Beer swatched by Dry, Dammit!

Wish You Were Beer is a gold glitter base with holo glitter. The holo is really divine and just transforms this polish into something else. I’m love wearing it; usually I’m not the biggest gold fan, but this is such an intricate polish. It looks pretty stunning as soon as any source of light hits it. I reckon even if you’re not a gold lover (like me) you could come to love this polish. What you see is just two coats, but I found with the second coat the polish got a bit gluggy, so you do need to be patient and apply it quickly. Otherwise, put the lid back on, shake it and wait until it’s runny again. I’ve topped it with a coat of Seche Vite.

Pretty Serious Cosmetics Wish You Were Beer swatched by Dry, Dammit!

Pretty Serious Cosmetics Wish You Were Beer swatched by Dry, Dammit!

DETAILS

What do you think of Wish You Were Beer? Let me know below. In the meantime, I’d recommend you at least look at Pretty Serious Cosmetics’ site as all its polishes are currently reduced to clear as it’s rebranding its polish bottles and other collateral. Thanks for reading!Save

Save

Save

Save

Save

Save


Leave a comment

Bettie Pain Polish Breathe, Just Breathe

*Nothing to disclose

Hi there! A quick post tonight to show you a polish I bought recently called Breathe, Just Breathe by Bettie Pain Polish. It’s from Bettie Pain’s Ever After Collection, which is inspired by the film of the same name. Let’s have a look!

Bettie Pain Polish Breathe, Just Breathe swatched by Dry, Dammit!

Bettie Pain Polish Breathe, Just Breathe swatched by Dry, Dammit!

Breathe, Just Breathe is a silver linear holo base with multicoloured flakies, red shimmer and small holo glitter. I just love the red shimmer! Although there’s a lot going on in the polish the formula was very manageable and easy to work with. I’m quite impressed this is two coats, actually. I thought I might need three, but I didn’t! I’ve topped it with Seche Vite.

Bettie Pain Polish Breathe, Just Breathe swatched by Dry, Dammit!

DETAILS

Breathe, Just Breathe has an elegant look to it that I’m sure a lot of people will love. I really love the macro photo – I can’t stop staring! What do you think? Thanks for reading!

Save

Save


5 Comments

Monochrome squares nail art

*Press sample

Hello hello! I hope your weekend has been enjoyable. Today I’m bringing you a look I wore more than a month ago now as I forgot I had photographed it. I hope you like it! It’s more nail art; this time I’ve used some square vinyls I bought from Emily de Molly and sponged a gradient of black and white on the vinyls and Celestial Cosmetics Candy Boat. I’m still working on my “lines” with vinyls, so excuse the uneven line widths (I find I can get a bit heavy-handed and then polish goes under the vinyl)!

Monochrome squares nail art by Dry, Dammit!

Monochrome squares nail art by Dry, Dammit!

Monochrome squares nail art by Dry, Dammit!

Monochrome squares nail art by Dry, Dammit!

The polishes I used for the black and white are both from Sinful Colors’ Sinful Shine Collection: Wisp (white) and Dark Room (black). I find with these two polishes you only need a little on the nail because they become opaque pretty easily. I tried to do four splotches in each corner, but looking at them now it looks like I just went from white to black in the middle and then back to black. Oh well. Like always with any design made with vinyls, these were a lot of fun to wear and so I’m looking forward to trying a few other shapes in the future. Thanks for reading!


2 Comments

Holographic swirl nail art

*Nothing to disclose

Hiya! I wasn’t sure what to call this post so I hope holographic swirl nail art will do. I wore this a while ago and posted it to Instagram, but thought I needed to do a blog post on it too as I loved wearing it. The base is Glam Polish Without Love from this year’s Hairspray Collection and the purple on top is ulta3 Radiant Orchid. I bought swirl vinyls recently from Emily de Molly and wanted to try them – I think it’s a great result!

Swirl nail art by Dry, Dammit!

Swirl nail art by Dry, Dammit!

Swirl nail art by Dry, Dammit!

Swirl nail art by Dry, Dammit!

I haven’t used vinyls before and so was really surprised with how easy they were to use. They have much better sticking power than nail stickers. I bought some other vinyls as well (squares and long triangles) that I’ll have to use now after the success of this attempt. I love this look with the holo peeking through. It looks more difficult than what it really is. Thanks for reading!


Leave a comment

Smitten Polish I Never Drink… Wine

*Nothing to disclose

Hello! Continuing my latest obsession with holographic polishes, I bring you Smitten Polish I Never Drink… Wine. My one and only Smitten Polish, it is a beauty! I believe it’s from the 2013 Turning Leaves Tree-o. I wore this a while ago – hence no cut on my middle finger – but I’m going to have to wear it again soon. I bought mine in a destash sale, but read on and I’ll let you know where you can pick yours up from!

Smitten Polish I Never Drink... Wine by Dry, Dammit!Inside with flash

Smitten Polish I Never Drink... Wine by Dry, Dammit!Outside in natural light

As you can probably tell by the name, I Never Drink… Wine is a red wine linear holo. It’s better in person and applying it was a breeze, I was really surprised. This is two coats with a top coat of Seche. You could wear it without top coat as it dries glossy but I always apply top coat for that extra shine. It’s got this incredible depth to it – perfect for winter! The holo is amazing, a beautiful rainbow of colours. Unfortunately again for me when I wore this Tasmanian weather had to play its part and block the sun from shining. While I’ve taken the holo shots with a flash, I can assure you it looks just as good in the sun, too.

Smitten Polish I Never Drink... Wine by Dry, Dammit!Inside with flash

Smitten Polish I Never Drink... Wine by Dry, Dammit!Inside with flash

Luckily, you can buy this polish at Femme Fatale Cosmetics. I say it’s well worth it if you’re looking for a warming wintery holo.

DETAILS

So, what do you think of I Never Drink… Wine? I have to admit I love the name. What are wearing on your fingers this winter? Thanks for reading!


2 Comments

Enchanted Polish Time to Pretend

*Nothing to disclose

Evening! Tonight I bring you a beautiful polish from Enchanted Polish. It’s my one and only Enchanted Polish and I’m so lucky I got it in a giant grab bag I bought from a nail polish sales group I’m in on Facebook. It’s called Time to Pretend and it’s from the 2013 Collection of the same name; Time to Pretend. I haven’t been able to find out much information about the collection but the photos are jaw-dropping so let’s see them!

Enchanted Polish Time to Pretend by Dry, Dammit!

Enchanted Polish Time to Pretend by Dry, Dammit!

So as you can tell Time to Pretend is a purple linear holographic polish with a striking holo effect. But it’s also a duochrome polish, which shifts from purple to copper / gold. It’s a beautiful polish and while I was lucky to capture the holo effect, I didn’t get the duochrome effect that well, sorry! Application was two exceptionally easy coats with a top coat of Seche. I was so surprised by how easy this polish was to apply. I’ve read so much about how great Enchanted Polish is in application, but until now I didn’t 100% believe it!

Enchanted Polish Time to Pretend by Dry, Dammit!

Enchanted Polish Time to Pretend by Dry, Dammit!

I unfortunately think this polish is discontinued now. I tried to look for it on Enchanted Polish’s website but no luck. So unless you stumble upon a bottle, you’ll just have to gawk at my photos, ha ha. 🙂 Thanks for reading!


4 Comments

The trip part 2: Italy, Greece & HEMA Holographic Blue

*Nothing to disclose

Hi out there! Yes, I’m still around, I’m loving travelling so much. I know I said I would post once a week while I was away… well, it turns out it’s pretty hard to get a decent WiFi connection in Europe in a hotel. Gosh I can’t believe it’s been a month since my last post.

Since my last post, my husband and I have travelled from Holland into France, Switzerland, Italy and now Greece, where we are at the moment. Yesterday we took a train from Athens to Thessaloniki. In two days’ time we take a bus to Skopje, the capital of Macedonia. We’re heading back towards western Europe now be in Germany in time for Christmas; we have a couple of friends we’re catching up with there.

Nail polish shopping was not so good for me in France or Switzerland. I found both countries to be very expensive and there wasn’t a lot of variety. Even in Rennes, a city in Brittany, France, you were paying Parisian prices. I know I go on a lot about the prices, but I don’t see the point of paying more or the same for a polish I can buy in Australia; I want to buy European polishes, dammit!

But the good news is once we entered Italy I found Kiko. Oh, Kiko! Kiko is an Italian brand (Milan), but strangely enough the nail polish is made in France. I know France manufactures a lot of nail polish, but so too does Italy. I resisted and just bought two, which I have worn and love, you can see them below, as well as two polishes I bought in Rome. The polishes in Rome are from a brand called Lilla, but I haven’t had a lot of luck finding a lot of information out about it. I think it’s a brand from an Italian chain called Beauty Point.

Italy haul

My nail polishes from Italy (from left): Kiko 245, Kiko 242, Lilla 12 and Lilla 53. Yes, all numbers sadly, not names. Oh, and sorry for the blurry photo!

Since entering Greece I’ve been overwhelmed with nail polishes, but they’re pretty basic, if that makes sense. There’s a department store everywhere called Hondos Center where there’s a combination of current mainstream brands, but then also a heap of ’80s looking nail polishes at very cheap prices. There’s a decent chain called Stop to Shop, but that’s like Hondos Center, but on a smaller scale. I’ve bought a few Essence polishes in Greece, you can see them below.

Greece haul

Nail polishes from Greece (from left): GoldenRose 111 from the Jolly Jewels Collection, Essence Ultimate Pink, Essence Sparkling Water Lily, Essence Oh My Glitter! and Essence Take a Ride on Pegasus from the Fantasia Collection.

But for now I want to show you HEMA Holographic Blue, which I showed you I bought in my last post. To be honest, I didn’t think it would be so holographic. But it’s incredible. I would very much compare it to an indie formula more than a mainstream formula, it’s that good. Buttery and consistent, what you see is just two coats. If you can get your hands on any of the polishes from the HEMA Special Effect Holographic Collection, I say do so!

HEMA Holographic Blue by Dry, Dammit!

See what I mean? The colours in the holo are beautiful and as I recall I wore this polish for about four days without any chipping. I haven’t tried Holographic Bordeaux yet, but I can’t wait to.

HEMA Holographic Blue by Dry, Dammit!

HEMA Holographic Blue by Dry, Dammit!

So I hope to update sooner rather than later next time, but we’ll see I guess. All I can say is thanks for bearing with me. I promise when I return to Australia I’ll be posting more regularly. But for now, here is a photo of me in Athens at a rooftop bar with the Acropolis in the background. Thanks for reading!

Haylee in Greece